
- The Monthly Maintenance for the Echo 2 includes the cleaning of the CR Scale and Carriage Shaft.

- The DTG printing process generates ink dust that can coat the surface of the Encoder Strip and the Carriage Shaft.
-
Entering Maintenance Mode
The Monthly Maintenance procedure should be performed once a month, in order to clean those specific parts and ensure that they operate properly for future use.
- When entering Maintenance mode, written instructions will appear on the Platen Control Panel that will give you guidance on how to correctly perform the Daily Maintenance procedure.
Procedure:
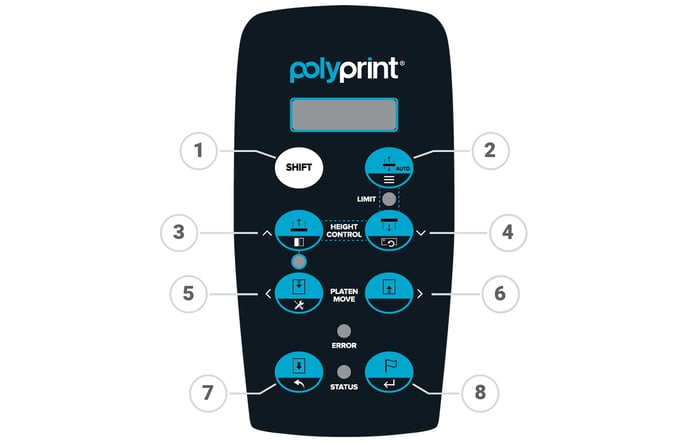
- Press Shift (1) + Move Platen Out (5) at the Platen Control panel, to enter Maintenance Mode.
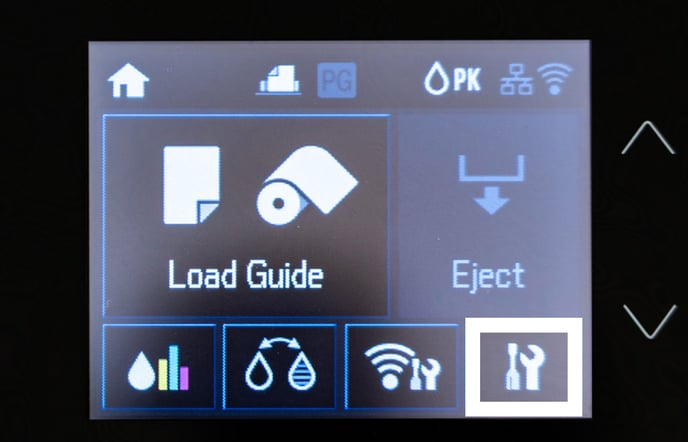
- Follow the instructions that will appear at the Platen Control panel. Tap on the Service button at the Printhead Control panel. Choose Maintenance, Print Head Cleaning and Head Cleaning.
- Wait for the Printhead Control panel to turn off. You can then proceed to safely clean both parts.
- The printhead should then be unlocked. Make sure the printhead is not unlocked for more than 10 minutes.
-
Cleaning the CR scale
The Encoder Strip also known as the Scale CR tells the printer where the printhead is along the track.
- Cleaning and Inspecting the Encoder Strip is important because if this is dirty it can result in the printhead jumping slightly causing streaks or missing ink and resulting in blurry prints.

- Put some cleaner or isopropyl alcohol onto a lint free cloth.
- Gently pass the cloth over the transparent strip, behind the Head Carriage.
- Move the Printhead to clean the right hand side of the Encoder Strip, over the Capping Station.
-
Cleaning and oiling Carriage Shaft
Removing dust and fibres from the Carriage shaft will help the carriage to move with ease.
- Pass a clean piece of the cloth over the carriage rail/shaft.

- Move the printhead again to clean the right hand side of the Rail/Shaft, over the Capping Station.
- Re-oil the Carriage Rail/Shaft. You can use Embroidery machine oil or WD40.
-
Selecting Maintenance Mode
After completing the cleaning of all parts, turn the gear, at the side of the printer clockwise until the wiper fits inside.
Move the Printhead back to it's home position above the capping station and continue turning the gear clockwise until its locked.
Tip: If you're not sure whether the Printhead is locked, try gently moving it away from the Capping Station. If it moves easily, it means the Printhead is not locked. In that case, push the Printhead back to it's home position above the Capping Station and repeat the process of turning the gear clockwise until it locks into place.
Press the home button to continue.
Press Shift (1) + Move Platen Out (5) at the Platen Control Panel, to exit Maintenance Mode.
Wait for the printer to reboot.
Bypass the Notice screens.
When Printhead Control panel goes to Home screen, select at Platen Control Panel the Maintenance mode you would like to perform.