EMT16X Setting acti-feed settings
Video Demonstration:
Acti-feed is the feature that replaces the tensioning system on a conventional embroidery machine. It uses thread feed gears, rollers, and a thread sensor bar to feed the appropriate amount of thread for each stitch.
Acti-Feed is the system that calculates and feeds the correct amount of thread per stitch during sewing. The amount of thread feed per stitch is dependent on material thickness.
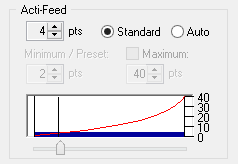
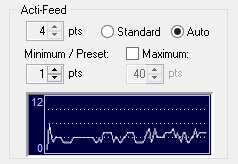
This section will walk you through Acti-Feed settings. Acti-Feed has two modes that can be changed by clicking on the radio button to the left of the desired mode.
• Standard
• Auto
Note: For the initial design, auto should work well.
Material Thickness
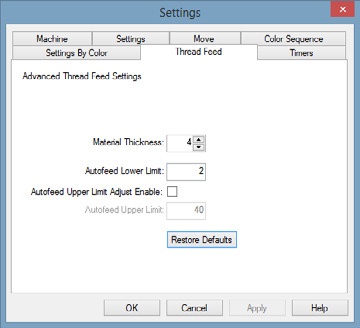
Material thickness is a determining factor in the amount of thread feed for each stitch. It is displayed under “Acti-Feed” in the Status Tab and the Advanced Status Tab. It can also be found in the Thread Feed Tab.
Material thickness is measured in points. Points are a very fine unit of measure found in the embroidery industry and represent a tenth of a millimetre.

In general, as material to be embroidered increases in thickness, the value for the material thickness should be higher to increase thread feed.
Standard Acti-Feed
Standard Acti-feed is used to feed thread at a user specified amount. It will not feed more or less thread than the amount specified. The amount can be adjusted by clicking on the up or down arrows to the right of the number. The number represents the material thickness.
The default value for the material thickness field is 4 points, but if running in standard acti-feed mode, you will need to adjust it to match your material. It can be adjusted to values ranging from 0-40 points.

Auto Acti-Feed
Auto Acti-feed is used to feed thread based on feedback from the thread sensor bar. This allows auto acti-feed to change the material thickness number as it is sewing to reflect changes in the material. This mode is ideal for any material or application that changes thickness. For example, it would be good to use for caps with seams or jackets with appliqué.
Note: While auto mode was designed for materials that change
thickness, it works well with most materials. It is recommended for your first sew-outs.

As the product being embroidered changes thickness, the thread dynamic changes and is reflected by the sensor. The sensor sends information back to the software, and the material thickness number is automatically adjusted. The changes in the material thickness are depicted in the moving graph just below the settings in the advanced tab.
NOTE: Bobbin tension should be set to drop 1-2” when bounced when using Acti-Feed Auto Mode.
Auto acti-feed automatically adjusts for different garment thicknesses. You can however provide some guidance in the form of lower limits. This will provide a range in which auto acti-feed must operate.
Information on these limits can be found in the Acti-Feed Limits section. While typically used with thicker materials, the lower limit (Minimum/Preset) is helpful when dealing with more delicate or squishy materials. It is helpful where the thread could pull tight, but a little more loft is desired.
Finding the Right Settings
Finding just the right settings or limits for your acti-feed is not always necessary, but it can make a marked improvement in sew quality and machine performance. See details in the following sections.
Auto Acti-Feed Limits
Auto acti-feed automatically adjusts for different garment thicknesses. You can however provide some guidance in the form of auto-feed limits. This will provide a range in which auto acti-feed must operate.
The autofeed lower limit guides auto mode with a minimum thread feed. It allows auto mode to adjust and feed more thread as needed, but it will not allow feeding less than the specified amount. The exception to this limit is the last few stitches before a trim. They will be allowed to feed less thread and essentially create a tighter tie stitch.
The lower limit is helpful when dealing with more delicate or squishy materials. It is helpful where the thread could pull tight, but a little more loft is desired. The auto-feed lower limit can be accessed through the Thread Feed Tab or through the Advanced Status Tab (if available) of the main Melco OS screen.
To access the lower limit:
-
1. Select Tools from the menu bar
-
2. Click on Settings.
-
3. Select the Thread Feed Tab
The same information can be accessed from the Advanced Status Tab if available in the main Melco OS screen. The auto-feed lower limit is shown as the “Minimum”.


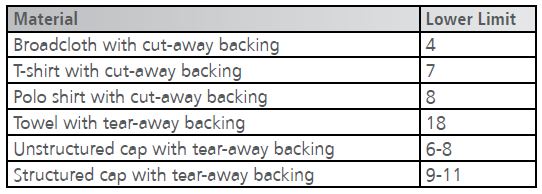
Autofeed Lower Limit Suggestions
The auto-feed lower limit is used to provide guidelines for auto act-feed mode. The following settings are suggestions of settings that might be used to better accommodate different fabrics and the backings. These settings may need to be adjusted as material weights differ across the variety of garments on the market.

Autofeed Upper Limit (Maximum)
The auto-feed upper limit is a seldom used, but occasionally handy feature. It is not available on all packages of the machine. If it is unavailable, the machine maximum of 40 points is used. The auto-feed upper limit restricts auto mode with a maximum thread feed. It allows auto mode to adjust and feed less thread as needed, but it will not allow feeding more than the specified amount.
The auto-feed upper limit is disabled by default and will use the machine maximum of 40 points unless the check box enabling the feature is checked. The auto-feed upper limit can be accessed through the Thread Feed Tab or through the Advanced Status Tab (if available) of the main Melco OS screen.
To access the upper limit:
-
1. Select Tools from the menu bar
-
2. Click on Settings.
-
3. Select the Thread Feed Tab
The same information can be accessed from the Advanced Status Tab if available in the main Melco OS screen. The auto-feed upper limit is shown as the “Maximum”.
Appropriate Material Thickness Settings
Finding just the right settings or limits for your acti-feed is not always necessary, but it can make a marked improvement in sew quality and machine performance. Sew quality and thread breaks are indicators of appropriate or inappropriate thread feed. Those symptoms are listed in sections below. The material thickness setting can either be adjusted in standard mode, or preferably, the lower limit could be adjusted in auto mode.
Material Thickness Value is Adequate When…
The material thickness does not need to be adjusted when:
-
Fill Stitches – On the back of the sew-out, the top thread is even along the edge.
-
Satin and fill stitches – There is no looping or pulling on the top of a sew-out when sewing satin and fill stitches.
-
Satin stitches – On the back side of the sewout, you can see 1/3 of bobbin showing in the middle of columns and the top colour for the remainder around the sides.
Decrease Material Thickness When…
When too much thread is being fed into the design, you need to decrease the material thickness value. If you experience any of the following problems, you may need to perform this adjustment.
-
False Bobbin Breaks – When the software detects bobbin breaks that are not really breaks, it could be that your material thickness is too high.
-
Fill stitches – You are encountering thread breaks and the stitches in the design are looping.
-
Satin stitches – Not enough bobbin is showing on the back of the design.
-
Satin stitches – The stitches in the design are looping.
Increase Material Thickness When…
When not enough thread is being fed into the design, you need to increase the material thickness value. If you experience any of the following problems, you may need to perform this adjustment.
-
Registration Loss – If designs are not lining up when sewn and the cause is the thread being pulled way too tight, increasing the Material Thickness may help. Using a stable backing will also help.
-
Satin stitches – Too much bobbin is showing on the back of the design.
-
Satin stitches – You are encountering thread breaks and you can see bobbin thread on the top of the design.
-
Fill stitches – You can see bobbin thread on the top of the design.
-
Fill stitches – There is not enough top thread showing on the back of the design.
