
A detailed process of how to properly unbox and accurately install the Pretreater Pro pretreatment machine.
Unboxing Pretreater Pro
-
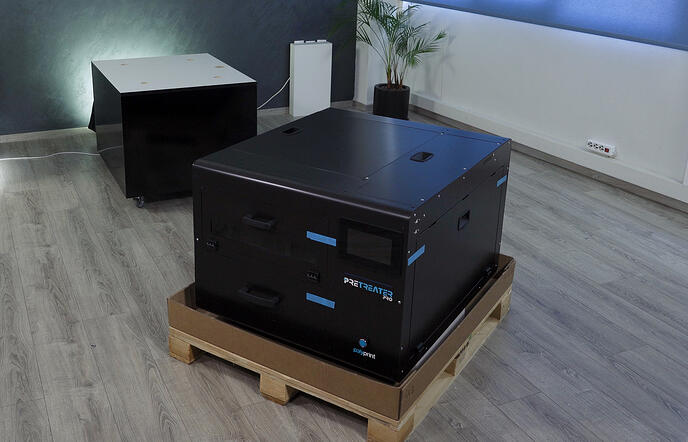
Step 1: First, remove the top cover from the carton box and right after, the styrofoam sheets, as well as the side carton cover to reveal the machine.
Notes:
- The machine weighs 100 kg approximately, hence it requires 4 people to lift it. Always carry it from the bottom. Never lift it utilizing the drawer handle, nor the Nozzle Access Cover.
- The height of the machine on the front side must be 660 mm (26 in.) and on the backside 643 mm (25.3 in.). If not, adjust the feet accordingly.
-
Step 3: Remove the blue security tapes from all the PreTreater Pro covers and open the Nozzle Access Cover.
-
Step 4: Open the drawer and check that the table is properly placed on it.
Note: Avoid places subject to rapid changes in temperature and humidity. Also, keep the machine away from direct sunlight and heat sources. Ideal operating conditions are 22°C-26°C temperature and 55% humidity.
Liquid Installation
-
Step 1: Open the Tank Access Cover to gain access to the Tank Storage Compartment.
-
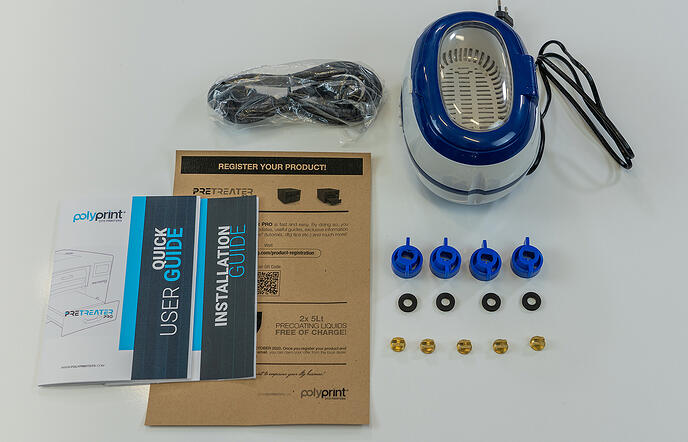
Step 2: Take out the box & the device you will find inside and check you have everything you need:
-Five (5) Nozzles
-Four (4) Empty Tanks
-Four (4) Gaskets
-Four (4) Blue Nozzle Holders
-One (1) Ultrasonic Device
-One (1) Power Cable
-One (1) Quick Installation Guide
-One (1) Quick User Guide
-One (1) Polyprint USB Key
-One (1) Registration Page
-
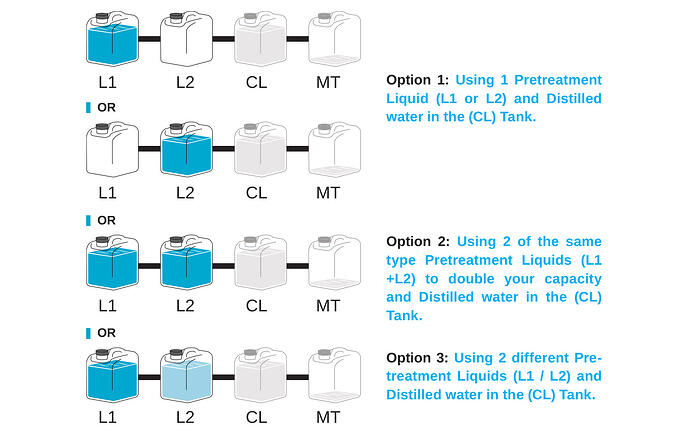
Step 3: There are 4 empty tanks in the slots L1, L2, CL, and MT. You can fill the empty tanks or directly use a new pretreatment tank in its place.
-
Step 4: Fill/Replace Tank L1 or/and L2 with the pretreatment liquid you are going to use. In case of using 2 pretreatment liquids, fill/replace both Tanks L1 and L2 with the according pretreatment liquid.
-
Step 5: Fill the Tank CL with distilled water.
Note: Shake the new tanks/bottles with the pretreatment well, before using them inside the machine.
Tank Filling Procedure
-
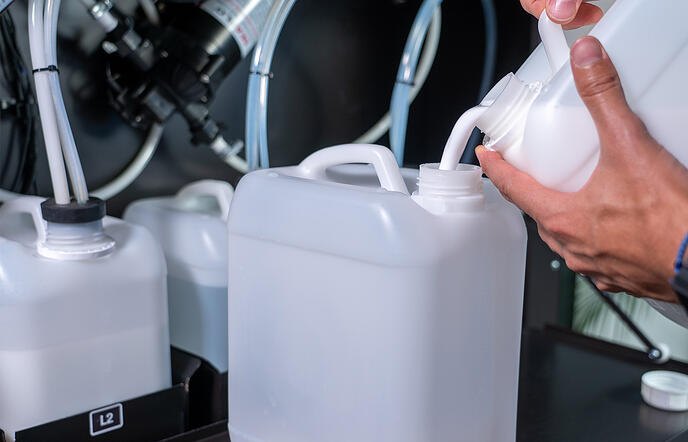
Step 1: Take the tank out of the slot and open its cap. Then, take the tubes out.
-
Step 2: Shake the pretreatment bottles well, before filling the tanks.
-
Step 3: Fill the tank with the pretreatment liquid. Ensure that it’s with the same pretreatment liquid type.
-
Step 4: Put the tubes inside the tank and close the cap. Ensure they are in place and properly sealed.
-
Step 5: Put the tank back into the slot and close the Tank Access Cover.
Tank Replacement
-
Step 1: Take the tank out of the slot and open its cap. Then, take the tubes out.
-
Step 2: Shake the pretreatment bottles well, before replacing the tanks.
-
Step 3: Put the tubes inside the new tank and close the cap. Ensure they are in place and properly sealed.

Step 4: Put the tank back into the slot and close the Tank Access Cover.
Note: Before closing the Tank Access Cover, ensure that all the tubes are inside the tanks and that the caps are in place and properly sealed.
Tip: You can use the Tank Access Cover as extra workspace.
Power ON for the first time
-
Step 1: Plug in the power cord. Make certain that the source voltage is the same as the rated voltage, listed on the serial number/rating plate. Power On the machine from the Main switch, that is placed at the backside of PreTreater Pro.
-
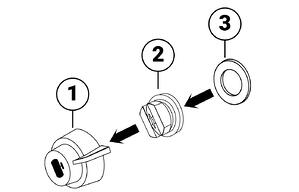
Step 2: Assemble the nozzles by following the steps below:
-Open the Nozzle Access Cover.
-Insert the nozzle inside the blue nozzle holder.
-Position the black gasket inside the blue nozzle holder and push it, in place, to tighten.
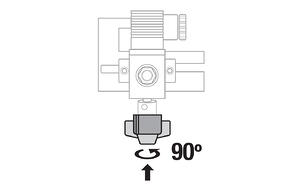
Step 3: Place inside the Nozzle Carriage Chamber the nozzle assemblies. Attach the nozzle assembly to the carriage and turn it 90 degrees counterclockwise to lock it in position.
Initial Liquid Charge
-
Step 1: To initiate the machine, tap the screen.
-
Step 2: Click here or scan the QR code register the product for full access to Polyprint’s Knowledge Base.

Note: You can also access the registration page by scanning the QR code on the registration page.
-
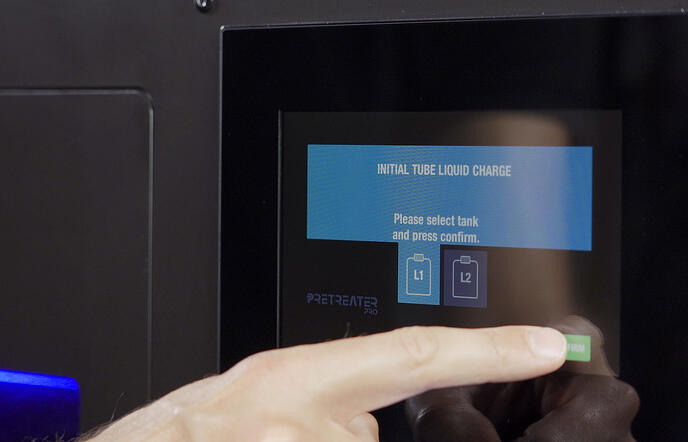
Step 3: Check that the CL, L1 and/or L2 Tanks are full and that all four (4) nozzles are properly placed into position.
-Press Confirm to continue with the liquid charge.
-In case you installed pretreatment liquid in L1 or L2 Tank, select the one you filled.
-In case you installed pretreatment liquid in both L1, L2 Tanks, select the one you wish to use first. -
Step 4: Press Confirm. After a couple of seconds, the initial liquid charge will finish.
Step 5: The machine is now filled with liquid and ready for operation.
Caution: If there is no liquid flowing, then check that all the tubes are inside the tanks and that the caps are in place and properly sealed.
Note: If you get any error messages, for further information, check the topic: Troubleshooting > General Problems in the Operational Manual that you will find in the USB Polyprint key.
Nozzle Check
You should perform a nozzle check to see if all four nozzles are firing correctly.
-
Step 1: To perform the nozzle check, start from the Home screen.
-
Step 2: Press the Nozzle button.
Tip: You can, also, open the Nozzle Access Cover to have a better view.
Step 3: Enable all the nozzles, one-by-one, (or only the nozzles you want to check).
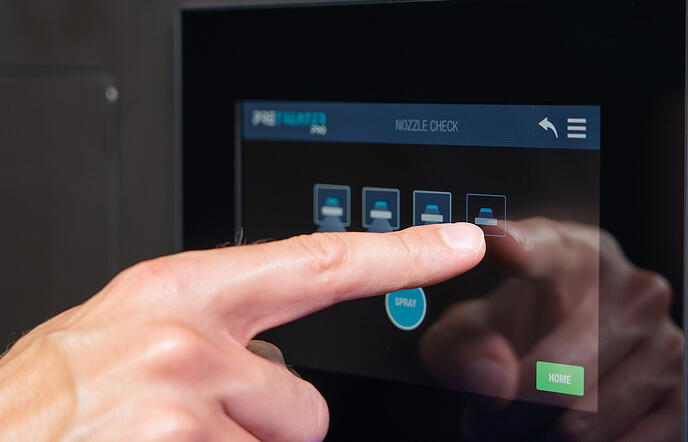
-
Step 4: Press the Spray button. Each nozzle should be firing in an 80 degrees angle.
-
Step 5: Exit the Nozzle Check screen, by pressing the back arrow, to return to the Home screen.
Note: If the nozzles are not firing correctly, for further information, check the topic: Troubleshooting > Spraying problems in the Operational Manual that you will find in the USB Polyprint key.