
Video instructions
Step-by-step instructions
- Wake up Procedure
- Check ink expiry
- Agitate Ink cartridges ensuring any sediment is removed
- Check Maintenance cartridge level and reset if necessary
- Perform Head Clean
- Print Nozzle Check
Wake Up Procedure
How to properly power on the printer every day so an uninterrupted workflow can be achieved. A step-by-step guide that will help you perform the wake-up procedure with ease.
- At the start of each printing day, an exact wake-up routine must be followed in order to ensure the smooth operation of the printer. After powering on the printer, written instructions will appear on the Platen Control panel that will give you guidance on how to perform correctly the wake-up procedure:
Procedure:
- Power on the Printer.

- After the Printer has checked the environmental conditions, press the home button (8).

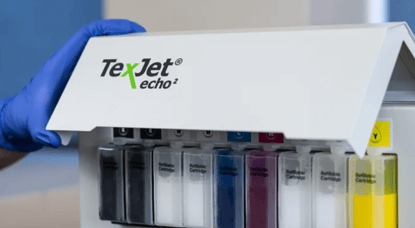
- As prompted, open the Ink Cartridge Cover.

- Remove the Ink Cartridges, following the correct steps for your type of Cartridge.
- Gently shake the cartridges for 1-2 minutes.

- Place each cartridges back into it's respective slot, make sure the Ink Cartridges are gripped properly by pushing the cartridge from the front until you hear a click.

- Close the Ink Cartridge cover.
- Press the Home button to continue (8)
- Bypass the Notice display screen by pressing Proceed, Proceed and Yes.

- Check the Maintenance Cartridge Level. If the indication is low, empty the cartridge and reset.
- Perform a Head Cleaning.
- Print a Nozzle Check to monitor the Printhead's condition.

- Check the Pattern. If there are any gaps, perform a Head Cleaning.
After the correct execution of the above steps, the printer is ready for use.
Check ink expiry dates
Adhering to the expiry dates of the ink will prevent clogging of the Printhead and Ink system.
- For Sealed Cartridges: You can find the expiry date on the side of the cartridge.

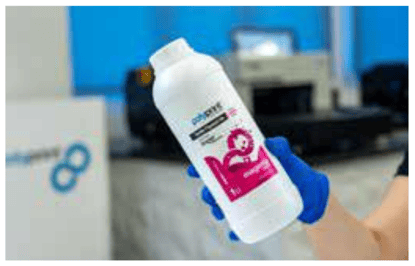
- For Refillable Cartridges: You will need to check the bottle that the ink has been decanted from.

- All back stock, including any Sealed Cartridges and Bottled Ink to be decanted into Refillable Cartridges must have the expiry dates checked on a regular basis to ensure expired ink is not placed into the printer.
- Agitate the ink cartridges ensuring any sediment is removed
- The ink needs to be agitated on a daily basis, to prevent sediment build up and ink seperation.
Agitate Ink Cartridges ensuring any sediment is removed
During the wake-up procedure, you will be prompted to open the ink cover and remove the cartridges to agitate the ink.
For Sealed cartridges:
- Open the ink cover.

- Firmly press down on the grey lever until you hear a click, the cartridge will then sit to the front of the housing.


- Remove the cartridge from the housing.
- Gently shake each cartridge for 1-2 minutes.
- Place each cartridge back in to it's respective slot, make sure that the cartridge is properly gripped by pushing the cartridge from the front until you hear a click.
- Close the Ink Cartridge cover.
- Any back stock of Sealed Cartridges will need to be agitated weekly and prior to being placed into the Printer.
- Store any back stock in a clean, dry area with a temperature regulated between 10-40 degrees celsius as the ink can be sensitive to environmental factors.
- Monitor weight of the Ink Cartridges, when using Sealed Cartridges replace any that weigh under 90kg with a new cartridge.
For Refillable cartridges:
- Open the ink cover
- Lightly pinch the rubber bung until you hear a soft hissing, this will only last a few seconds.
- Remove the cartridge from the housing.
- Gently shake each cartridge for 1-2 minutes.
- Place each cartridge back in to it's respective slot, make sure that the cartridge is properly gripped by pushing the cartridge from the front until you hear a click.
- Close the Ink Cartridge cover.
- Any back stock of Bottled Ink will need to be agitated weekly and prior to being placed into the Printer.
- Store any back stock in a clean, dry area with a temperature regulated between 10-40 degrees celsius as the ink can be sensitive to environmental factors.
Check the maintenance cartridge level and reset if necessary
When the level is low, it indicates that you need to empty and reset the maintenance cartridge, because the used cartridge is running out of space.
- To check waste cartridge level, tap on the drop icon on the Printhead Control panel.
- Maintenance cartridges can be reset until they reach 80%. If you can see more than half of the bar is white, empty and reset the maintenance cartridge:
Look at the ink levels on the top screen of the printer, also known as the Printhead Control Panel.
Look at the furthest bar on the right hand side.
Check the level of the maintenance cartridge, the more white you see the fuller the maintenance cartridge and the more yellow you see the emptier the maintenance cartridge.
Procedure:
- Send the Platen inside by pressing either the Start Position button (8) or the blue button seperate to the control panel.
- Make sure the Printer is in READY TO PRINT state.
- Open the Maintenance cartridge cover.
- Remove and empty the Maintenance cartridge, avoid getting the chip on the side of the cartridge wet when emptying the waste ink.
- Reset the Maintenance cartridge using the resetter. Hold the resetter to the chip until the light goes from red to green, this should only take a few seconds.

- Open and close the ink cartridge cover.
- Re-insert the Maintenance cartridge back in to it's initial position.
- Open and close the ink cartridge cover once again (this will force the printer to check the ink cartridges allowing it to read any new maintenance cartridges).
- The Maintenance cartridge level should then show as completley yellow again.
- Otherwise repeat this process.
Perform Head Clean
A head cleaning should always be performed at the start of the day, to make sure that the Printhead is in excellent condition and to remove any ink that has settled in the ink flow route during any idle time.
- Select the Settings icon on the Printhead Control Panel and choose Maintenance, Print Head Cleaning and Heavy Head Clean.

Print nozzle check
How to properly print a Nozzle Check. A step-by-step guide that will help you perform a Nozzle Check with ease.
- A Nozzle check pattern is printed in order to check the condition of the Printhead. A nozzle check should always be performed at the start of the production, after your first head clean, to make sure the Printhead is in excellent condition and will give you the best possible quality.
- If there are nozzles or even entire channels missing, this is a strong indicator that your printhead needs a cleaning.
Procedure:
- Wake-up your printer correctly, following the Wake-Up Procedure.
- Eject the platen using the Eject Platen Button (7).
- Place a transparent sheet/acetate on the left corner of the platen.
- Perform the Auto-Height Adjustment process. Press the AUTO button (2) on the Platen Control Panel to set the platen at the ideal distance from the Printhead.
- Send the Platen inside by pressing either the Start Position button (8) or the blue button seperate to the control panel.
- On the top screen, also known as the Printhead Control Panel, tap on Settings. Choose Maintenance and then Print Head Nozzle Check.
- Check the printed pattern on the sheet. All eight channels should be visible together with their nozzles.
- If there are gaps (missing nozzles) perform a Head Cleaning or a Heavy Head Cleaning - depending on the severeness of the missing nozzles, to recover them.
